


I have found that for the ‘just stepped out of a painting’ effect, you generally need to address what you are going to do with the top of your head. For many locations and time periods, this means considering what sort of hat or veil you should wear. For middle to late 16th century Italy, it means that you need to figure out how to dress your hair.
While wearing your hair down might feel very pretty, it is not a common sight in period images, except for biblical or getting-dressed scenes.
Let’s take a quick look at some portraits and what sort of styles ladies are wearing in northern Italy.

Self-portrait at the Easel, 1532, Sofonisba Anguissola, Detail
I do so love Anguissola’s paintings. She lived in Cremona and Milan, and I feel that her paintings before 1560 mostly reflect fashions of those areas (Lombardy region). She did many paintings of herself and her sisters, mostly portraying all the girls with a small section of hair rolled back from the hairline, always center parted, and with a twisted or braided element toward the back of their heads, often taped/sewn down with ribbon.
![Two Sisters & One Brother from the Family Gaddi [1555-60], Sofonisba Anguissola](http://http://www.morgandonner.com//wp-content/uploads/2014/01/3674978597_87059d25ff_o.jpg)
Two Sisters & One Brother from the Family Gaddi [1555-60], Sofonisba Anguissola

This flickr gallery by Petrus Agricola is just lovely for looking at a bunch of Sofonisba Anguissola’s paintings at once. Be careful about looking at anything past 1560 or so, since she moved to Spain to paint the courtly ladies, and any images past that point are too influenced by Spanish fashion.

PORTRAIT OF A LADY, Florentine school, 16th century.
In this portrait of a lady by an unknown artist, we can see that she has also rolled her fringe hair back, with quite a bit of volume visible on the left. It looks like her gold hair jewelry might actually be in the middle of that roll. The back of her head must be interesting, we can only see a small portion of her hair length. It doesn’t look braided to me, perhaps twisted and then anchored in place with the white ribbons?

Alessandro Allori (Italian, 1535–1607), Portrait of a Young Woman, c. 1580s. Private collection. Photo by Glenn Castellano.
Allori is another fabulous painter for hair, although it would have been nice if he had painted more blond ladies. It’s hard to see what’s going on in all that dark hair.

Painting Associated with the Artist or the Workshop of Alessandro Allori (Italian, 1535-1607) Portrait of a Florentine Lady 1560
Both of the paintings above show women with hair encircled in a strand of tiny pearls. It has a similar look to ribbon hairtaping, but it’s more likely that they wrapped the braid in the strand of pearls, then secured it down with ribbon or pins. Both have hair jewelry, both have curled fringe.
And we cannot forget Moroni:

Many of the hairstyles above do not require shorter hair at the hairline (also known as bangs or fringe modernly), since you can simply roll your hair back from the hairline at any length to get a nice tapered look. But several of them clearly have long hair that has been put up into braids, but have little curls in the front. Some women naturally have a lot of little hairs shorter than the rest in that area, but I don’t so I had to cut my hair to get the same look.

As you can see, I have sort of weird bangs: I have cut a little sliver of hair just at the edges of my hairline near my temple, but the shorter hair on top is the more normal triangular shaped base. Well, normal for modern bangs/fringe; the 16th century portraits look as though they did a thin section of shorter hair from ear to ear.
There are a few ways you could curl this area: in the picture above, I have wetted my hair and then pincurled very small sections at a time.

After it has dried, you can pull the pins out and have a messy pile of curls (which actually sort of remind me of the Venetian horns…) or you can gently roll the curls together to create a continuous roll, depending on your inspiration images. Pincurls are great for camping events, since you can set them up before bed, put a bandana on to protect them, and they’ll be dry by morning (with no bandana, mine dry in about 3 hours).
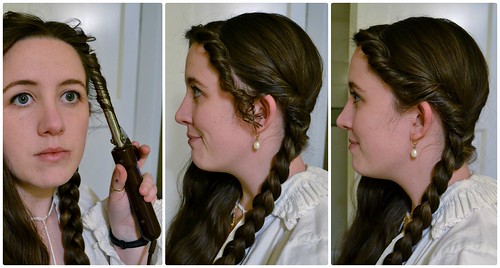
However, if you are day-tripping an event from your home (or it’s a hotel event) then you can use a curling iron instead, especially if you forgot to put your pin curls in before it was way too late for them to dry in time (which is the only reason I have the above pictures, oops!). Our curling irons require an outlet, but I imaging that period curling irons would have been similar to ruff setting iron sticks, and could have been heated up in the same way. I haven’t actually done any research yet on 16th century hair curling methods, but since the technology was already there for ruffs, why not hair?
I get a lot of questions about how to add false hair to your own. You can braid up a piece of false hair and simply coil it into a bun around your own bun, but I like to add mine during the braiding process.
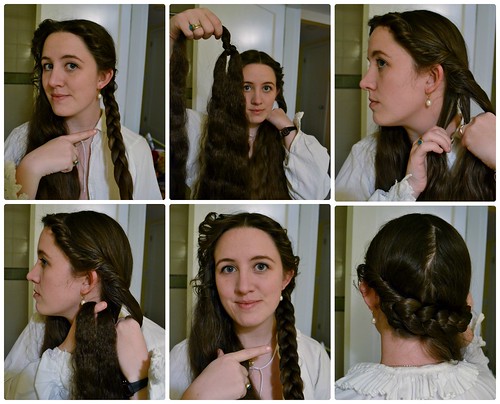
I got my hair from my local Sally Beauty Supply, for around $5 USD. It was just a length of hair, no clip or anything, already loosely braided I think. I split the hair in half, since I wanted to braid it into two different braids, and then I divided those sections into three, for a total of six sections. Each set of three got folded in half and then ‘knotted’ together using the paranda method shown on Habioku’s site (many images on that site seem to be dead, so here’s a video version of the same method!).
I then add the knotted area to the base of my own hair, which is already split into three, and I add the three sections of the fake hair to my own, then braid as usual. The result is a braid that is really only a little bit bigger than my natural one since the false hair looks big, but actually compacts down a lot. You might then wonder why I am adding false hair to my own if it doesn’t make a huge difference. Well, I don’t add it usually. My hair is long enough now that I can complete the halo of braid around my head, so they are not very necessary at this point. But for fancy occasions, I’ll sometimes add them for the little extra oomph they give to the whole look.
 Now what if your natural braid has a lot of taper? Starts out at a thickness you like, but thins down too much by the time you get to the end? You can add your false hair (demonstrated here with yarn) farther down your braid, rather than starting at the base. The knot at the top of your false hair is likely going to be visible on one side of your braid: make sure it’s the side that will eventually be against your head.
Want to make your braid extra long but even along it’s length (very useful for a single braid that encircles the head)? You can add multiple false hair pieces for a continuous look (keep them thin though!)

When you are done braiding, arrange the base of your braid in whatever direction you plan for your final hairstyle to verify that the beginning knot of your false hair isn’t peeking out in a totally obvious way. If it does, rebraid that section of hair until it is invisible.

My synthetic hair matched the top half of my hair very well, but not so much on the bottom half. Since that part of my hair is several years old by now, it has been in the sun enough to bleach a little bit. I don’t mind the mismatch too much.
If your own hair is much shorter than the augmented hair, then try to tuck your own ends into the false hair as you continue braiding, to reduce the amount of hair splaying out.

To mimic my Italian lovelies, especially the versions where the braid is just visible from the front, I wrap my braids around my head and pin them in place temporarily with hairpins or bobby pins.

If your hair roll becomes mussed from dressing or your hat, use your fingers to roll it back in place, starting at the part and continuing down, making sure the ends are tucked if the style requires that.

I could leave my hair like this if I like, since there are some portraits that don’t appear to have any hairtaping, but if you want that pretty splash of contrasting color, go get your ribbon. Length is a bit hard to guess, my ribbons are usually about two-three arm lengths, depending on whether or not I am wrapping the ribbon around my head after my braid is taped down.

Once you have sewn the braids to your down, take the ends and tie them in a bow, either behind your neck or on top of your head. If you find that your ties are uneven, or you have too much slack, don’t cut it shorter (unless you seriously have a lot of extra slack) otherwise you’ll end up cutting it a little shorter every time you wear your hair like this, and that poor ribbon will become too short to use before long. So I fix that by either wrapping the long strand all the way around my head (good if you have a foot or two more than you need) or by adding an extra stitch or two around the braid at the base of my neck (good for shortening just a couple inches).


Yay hair ribbons!


Awesome picture by juan_guthrie on Flickr (click on the picture to see more of his gallery!)


