Here’s part two for the farthingale! It shows how I constructed the bodice :D
Just like in part one, here’s a transcript of the video for those that would prefer non-moving dress diaries!
“Now that our pattern is complete and tested with a mock-up, it is time to start creating the actual dress! I like to use chalk to draw my outline but always test it on a corner of fabric first sometimes chalk will not rub out as well on some fabrics versus others. I did not include a seam allowance on the paper pattern so I am adding that to the fabric now. I tend to prefer a 1 cm seam allowance because that is the width of my sewing machine foot. More might be better if you are using fabric that wants to fray.
Next up, I separate my front and back pieces to make them easier to maneuver, and add the interlining and lining. I am cutting three layers for each pattern piece, a polka dot fashion layer which will be visible on the outside when we’re done and two layers of canvas. This bodice is going to have a lot of structure and the canvas will provide a lot of the needed body and strength. As a side note, this beautiful polka dot fabric is not something I would recommend for historical garments, I am using it because it’s for an under-gown, and theoretically won’t be seen much unless I am chillin’ around in my undies. Which will, almost guaranteed, totally happen, but it’s fun and cute and I had just the right amount!
This bodice is going to be boned, so I set aside the grey fabric for now, and just grab the canvas. To create my boning channels, I start with a initial stitch line at the front edge, then insert a zip tie (the really big industrial sized kind) and stitch along the bump with a zipper foot to create the perfect size channels every time. You could also just measure the width that you’ll need for a channel instead and skip this inserting each time thing to create your new width. Stitching a line at the bottom of the channels will keep your bones from falling out as you insert them.
Don’t forget to include a bone or two in the back seam! It doesn’t really need support the way the front does, but that little point at the bottom will wrinkle and fold up if we don’t give it some bone support. I reclaimed the plastic bones from the mockup in the previous video, since they are already the perfect lengths! No reason to cut a whole new batch! Now it’s time to sew the side seams and shoulder seams! I am a big believer in pins! They really help keep mistakes to a minimum, and prevent some seam ripping and frustration! The fashion polka dot layer also is sewn together now, side seams and shoulder seams.
I love ironing, it instantly makes the fabric and seams look so lovely! Look how flat that canvas seam is! Be careful when you’re switching between different fabrics when ironing, here my polyester polka dot fabric requires a much lower temperature then the cotton canvas. I will risk melting the fabric if I keep ironing at the higher temperature.
With everything smooth, we can join the outer fashion fabric and the canvas lining! Excessive use of pins is highly recommended here! If there is any slack or puckering in the top layer, it will really show in the final garment. I am cutting about 1 cm off of the neckline here because this dress is eventually destined to be a supportive under-gown. I don’t want the edge of the dark fabric visible when I have an over-dress on.
I would like to finish my edges with a facing so I am cutting up my scrap fabric here to create a long strip of bias tape for facing. I don’t have a lot of this fabric, and I still need to cut out a whole skirt so I am starting with scrap to stretch what I have left as much as possible. Join the strips so they become one long strip of bias tape and sew that tape around the edge of the bodice. If I were to do this again I would probably bind the edges rather than try to face them, but live and learn.
Of course, right after I recommend using ALL THE PINS, ALL THE TIME, I am sewing this tape without any pins, but that’s because I need to maneuver around these tight corners, and I find pins hinder a bit more than they help here.
After sewing, I am trimming down one of the layers of canvas right next to the stitch line to try and reduce some of the bulk in the seam. Two layers of canvas was probably a bit much here, I should have used one layer of canvas and another of some sturdy but lighter fabric to make the boning channels if I want to turn all my seam allowances in. The next part is a bit fiddly: I am turning all of the facings in towards the lining to create a clean edge. As I turn, I pin and adjust the fabric smooth, sometimes clipping the bias tape to get the facing to stretch around a inner corner.
I like to hand sew the facings down to avoid any visible machine stitching on the outside of the bodice. I am stitching the grey facing to the canvas lining with a whip Stitch, taking care to not let the needle catch any of the surface fabric. The arm hole or armscye is going to be bound instead of faced, so I am just doing some running stitches here to tack the fabric down where it will eventually not be visible since it will get covered with a bias strip binding.
To lace up the bodice, I am using a awl to poke holes big enough for my tapestry needle and ribbon to lace through. Later on, the holes created here could be reinforced with eyelets but this fabric is so strong that I will probably just leave it without eyelets.
It’s time for my favorite part again, trying on the the bodice! Very quickly here I figured out that it’s smaller than I wanted it to be. My mock-up was able to meet in the middle just fine, but it was also only two layers of much thinner fabric. It fooled me into thinking it was too big, so I removed an inch out of the side seam, which means it’s now too small! Always use the same fabric as your final version if possible!
Time to fix the mistake! Fortunately it’s not unheard of to have a lace up front and sides , so I’m going to unpick the side seam and turn it into lace-up openings.
Be very careful when you are seam ripping, it is easy to accidentally cut into your fabric like I have here. Whoops! To finish this seam, I am just whipstitching the edges together.
While I’m doing some hand sewing here anyway, I might as well also finish the bottom. First I trim away the excess canvas seam allowance, then do some basting stitches to keep the canvas seam allowance flat, then I can fold the gray seam allowance under and whip stitch the two fabrics together. The front bodice pieces get the same treatment, tack down the canvas seam allowance to make it flat (usually I just use a running Stitch) then tack down the fashion fabric with some whip stitches taking care to keep them as invisible as possible! The corner here is a bit tricky and just requires a bit of careful finagling.
With the bodice nearing completion we can finally start out on the skirt! The construction of the skirt will be part of the next video, but for now I need to start cutting because I need a little bit more bias tape to bind the armscye of my bodice so I am using the diagonal space in between these two gores to get that additional strip. It will not be true bias as this is not perfectly on the 45-degree diagonal but it will work well enough.
To finish off the straps, I sew some of that “not quite bias tape” onto the shoulder seam then wrap it around to encase the raw edges. Pins help hold it in place until I can start sewing the binding down.
The bodice is pretty much done! We just need to get it laced up! I removed the white ribbon from earlier, to replace it with this black ribbon to better match the fabric. I like to start my laces with a slip knot for easy untying later. I already opened lacing holes for the front, but the back openings both still need to be measured, and new holes made with the awl. The lacing holes here are about one inch apart. And with that, we are done with the bodice! Skirt time next!
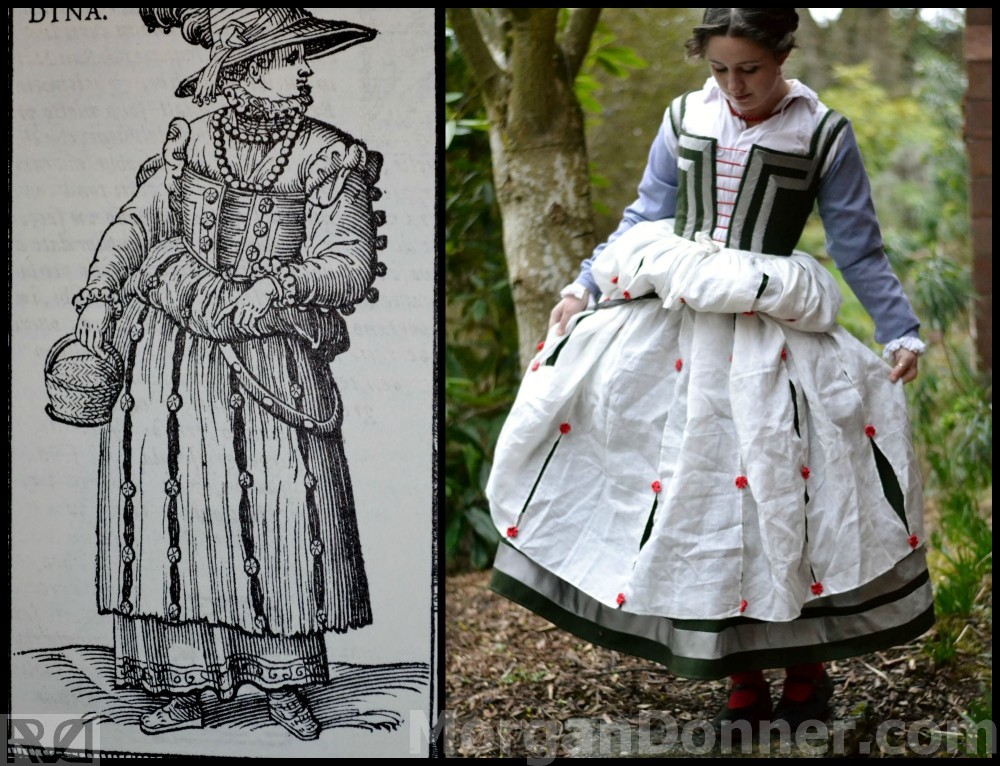
I have noticed several images, mostly late 16th century Italian, showing women wearing some sort of apron-like skirt that goes all the way around their normal dress skirt. I would
My super awesome friend Temetgen was offered her laurel earlier this summer. After squeeing, and bugging her for a bit, she agreed to let me help out with some of her
I have seen many loose overgowns or coats, both in portraiture and on costumers. They made me think that it might be nice someday to make a loose gown to